-->

12.23.2015

Current Beauty Favourites!

Hello everyone! Wow, it's been a while huh? My apologies for that, I've been so busy recently with work and University that blogging is something I just haven't had any time for. However, I'm slowly organising myself and getting back on track and so I'm back today with you for a beauty favourites post!


So, these favourites are going to be beauty products that I've been enjoying over the past few months. To start, we have my Beauty Uk Brow Kit. I've been enjoying this kit because it has everything you need in it; it has good colour variation and even comes with wax, an angled brush and a teeny pair of tweezers!

Next is Milani's Baked Blush in Luminoso - this is a really beautiful natural shade that looks great on lighter skin tones - especially if you have a yellow undertone. It blends like a dream and is really easy to build up in intensity - definitely try these blushes if you never have!


The infamous Chocolate Bar Palette from TooFaced is another beauty product I've been loving as of late. I can create multiple looks with these colours which is one of the reasons I'm really enjoying it. It also smells beautiful as it's actually made of cocoa powder which is an added bonus. 

MAC's Soft Ochre Paint Pot has been my favourite base for eyeshadow lately - it covers all my pigmentation on my eyelids and really helps to grab onto the eyeshadow that I apply. A little bit of this product goes a long way so it's definitely worth the money.


I have found the best way to apply my foundation and that is with a damp beauty sponge - honestly, it's amazing! I used to use this Real Techniques Sponge without wetting it - little did I know what I'd been missing. My foundation looks so flawless and natural when using this technique and for about a quarter of the price of a Beauty Blender, this Real Techniques sponge is a bargain.

My go to highlight these past few months has been Benefit's High Beam - it is such a beautiful, natural highlight that really makes it look like your skin is actually glowing. It's super easy to blend as it's a liquid formulation and it lasts for ages!

Finally, TooFaced's Sweetheart in the shade Something About Berry has been my final beauty favourite - I love how flattering this shade is on my skin tone as well as how glowy it makes my skin look. It's a mixture of three shades so it can be used individual or swirled together for a lovely flush to the cheeks.

And there you have my current beauty favourites! Thank you for reading and hello to anyone new blog readers I may have gained whilst I've been gone!

What are you current favourites?


11.13.2015

REVIEW | TooFaced Sweethearts Blush

I first discovered TooFaced with my purchase of the infamous Chocolate palette about a year ago. I wasn't disappointed by the hype it had produced and from that day on, I knew I wanted to try more that the brand had to offer. 
Whilst I had dabbled with eye and lip products, I'd never tried anything they had to offer for the face and when the Sweetheart Blushes came on the scene, I knew I had to try one. A few months ago, I finally picked up the shade I'd been eyeing up for some time and today, I'm going to review it for you - enjoy.


Where to Buy From? Debenhams
How Much?  £24.00

What TooFaced Have to Say:

"In each baked, heart shaped blush there are three individual color swatches. The baking process and multiple colors create dimensional color to provide the look of younger, brighter, healthier skin. It’s like having Hollywood lighting wherever you go."

My Thoughts:

The first thing that I noticed about this blush is its packaging. Like with all of the TooFaced product's the packaging is so adorable, very girly and just well, pretty. I really like this aspect because it's nice for a beauty product to also look aesthetically good itself - especially if you like to display your makeup items. What I'm not so much of a fan of however is the Benefit-esque cardboard packaging. For something as expensive as it is, I would like to have seen better packaging made from a more durable material.


So, in terms of the product itself I'll firstly start by talking about the shade. As far as I am aware, the Sweethearts Blushes come in 3 shades, mine is called "Something About Berry". As mentioned in the description TooFaced provided for this blush, it is actually a trio which can be applied individually by colour or swirled together and applied as one. The colours within this blush are a mauve pink shade, a peach and a deeper magenta pink. When swirled together, you get a beautiful medium pink shade that has a gorgeous and subtle shimmer to it. 


The blush itself is baked and this is always a formulation of blush that I enjoy. I find colours to be more intense but at the same time, I find them to also be softer and easier to blend. I'd say this is definitely the case with this blush. I would however say, it is quite easy to get carried away and blend away the intensity on this blush so I'd suggest going slow and using more of a "patting" motion where you'd like the most colour payoff. The colour is really beautiful though and it adds a lovely natural glow and flush of colour to the cheeks. As stated, it is buildable depending on the look you're going for and I think this shade is versatile for a lot of skin colours. Having worn it for at least a good 6 hours, I can definitely say that it lasts well as well which is always a winner in my book. 

Overall, I'm really enjoying this blusher and I think it's really beautiful. I'm definitely interested in trying the peach shade in the range and I do believe this is a good quality blush that's worth the money - especially if you're a fan of brands like TooFaced. If the price tag is a little too much, I think this would make a great gift for a beauty lover. 

11.04.2015

Christmas Beauty Gifts from Too Faced and Benefit!

It's socially acceptable to start talking about Christmas now, right? Regardless, whether you're a fan of the early Christmas organiser or you leave it all to the last minute, it's nice to have some gift inspiration.

Whilst spending part of the money I should really be saving on you know, the necessities like makeup, I realised that some of these purchases would actually make great gifts. If you know someone who loves beauty and makeup, this may the post for you.

Too Faced's Melted French Kisses Gift Set - £22.00


TooFaced's infamous Melted Lipsticks are £19.00 a pop and so are quite the splurge for someone new to them and indeed, most of us in general for only one product. However, they recently came out with a cute little Christmas gift set containing four mini Melted Lipsticks for you to try and for the impressive price of only £22.00! You get a good variety of shades with some neutrals and brights as well as the chance to try not only their original formula, but also their "Metallic" formulation too. As a fan of their liquid lipsticks, I'm definitely all for this set and as anyone who has tried liquid lipsticks know, they last for ages so though these may be small, you're going to get a lot out of them.

The shades you get in this collection are (From L to R):

Metallic Peony, Chihuahua, Metallic Macaron & Berry. 

Benefit Stocking Filler Gift Set - £15.00


This last gift idea is probably my favourite and is one I treated myself to last year as well! Basically, every year Boots have on offer in which you receive a free (and super cute) Benefit stocking as well as 4 luxury sized samples from the brand for £15.00. The selections change slughly every year and this year, I got 2 mini's of their That Gal Primer, Bad Gal Lash Mascara and a mini Bad Gal eyeliner!

As with the TooFaced set, this is such a great way to try out some of what other brands have to offer - especially if you're new to them. You get deluxe samples in each set and so you're going to get a really good idea of what a product has to offer and whether or not it's for you!


What do you think of these cute Christmas gifts?


10.25.2015

NOTD | Frozen

Today's nails were unintentionally Frozen inspired, apparently. As I unknowingly completed my manicure, I realised the striking resemblance to the theme of the movie and decided to just roll with it. I suppose it's actually quite appropriate for this time year!


What I'm Wearing:

Essie - I'm Addicted
Barry M - Diamond Glitter (350)

10.19.2015

REVIEW | MAC Prep & Prime Fix +

Hey everyone! Today I have a review for you on a purchase I made a few weeks ago. I've never tried any kind of makeup setting spray or makeup spritz but have been interested in purchasing one of them for a while. MAC's infamous Fix + is one I've heard a lot about and so I finally gave in and bought it from my local MAC stand. 
Today I shall share my thoughts and feelings on it - enjoy!


Price: £17.00
Where to Buy? Here.

So firstly, let me tell you a bit about this product and its intended use. MAC describe this product as "a lightweight, mineral rich finishing mist that refreshes the skin and finishes makeup." It is a clear liquid formula and is designed as described to create an even surface for makeup prior to application and also as a spritz to finish it. 

In terms of packaging, I am always a fan of MAC and theirs. The bottle is sleek and see-through which allows you to actually see how much you product you have left. The nozzle locks with a simple twist and the spritz itself is fairly fine which I like.


This product has a slight scent which is very pleasant and not at all that noticeable - especially when on the skin. As described, it definitely refreshes the skin and provides it with a cooling mist of application. The product dries into the skin within a few seconds and having applied it with full makeup on (including eyeliner and mascara), it definitely doesn't make any of it run or slip off.


Overall I'm really pleased and actually pleasantly surprised with this product. It does a fantastic job of priming my face for makeup as well as eradicating that cakey, powdery look we've all had. It provides me with a soft, smooth and moisturised base for foundation as well as a dewy finish to the skin when used as a finishing spray. 

I would stress however that this product is NOT a setting spray and isn't great for oil control. I use this in conjunction with a setting spray / or powder in the t-zone to eliminate oil build-up and I love the result. You don't need much - a spray is enough for me so for that reason, I think it's a pretty good deal for the price especially considering it's MAC. 

Have you tried this product? What are your thoughts and feelings on it if so?

Thanks for reading! <3


10.11.2015

Nice is Nice

I know, I know. I've been away for a while and have pretty much fallen off of the blogging radar. Truth be told, it's my final year at University and I'm trying my best to adjust! I shall utilise my organisational skills and be back at regular blogging soon, promise.

In the meantime, I have a nail post for you all. Today I'm wearing Essie - Nice is Nice which is a really beautiful, pale muted Lilac shade. I'm loving pale, neutral shades lately and this one is easily one of my current favourites along with Essie as a brand, too. I picked up this awesome shade for the unbelievably good price of £2.49 - yep, you read correctly. Head over to FragranceDirect for amazing deals on Essie - it is my go to site for discounts on higher end nail products!


10.05.2015

Nails of the Day | 05/10/15

Hey guys! I hope everyone is doing well! I recently started back at University and man, it's been stressful. It is my final year so it's safe to say there's a lot of work ahead of me. Anyway, today I have a nail post for you. 

I'm wearing Essie - Pedal Pushers which is a really beautiful cool-toned grey. 


10.03.2015

REVIEW | Lush Oatifix Face Mask

Skincare has become really important to me over the years. Having sensitive skin however, makes things like pampering yourself a little bit trickier - particularly when it comes to face masks. I don't find there to be enough face masks out there for those of us with easily aggravated skin so when I found one from Lush, I was very pleased. The mask in question is called "Oatifix" and is made especially for dry and sensitive skin types.


Where to Buy: Lush
How Much? £6.50

Lush describes this face mask as "gentle and nourishing.. Made with fresh bananas and illipe butter to moisture dry skin".  Also in this mask as the name suggests is Oatmeal which is known for it's soothing properties. 

Here's a full list of ingredients:


  • Glycerine
  • Fine Oatmeal
  • Fresh Organic Fair Trade Banana
  • Water (Aqua),
  • Ground Almonds, 
  • Organic Illipe Butter, 
  • Kaolin 
  • Talc, 
  • Fair Trade Vanilla Absolute,
  • Sandalwood Oil, 
  • Benzoin Resinoid, 
  • Coumarin, 
  • Benzyl Cinnamate, 
  • Linalool, 
  • Perfume,
  • Gardenia Extract


  • My Thoughts:

  • The first things I noticed about this product was the smell. It smells so good! Like something freshly baked out of the oven, I could happily eat it. This for me is always a nice factor because it really adds to that pampering feeling when the products you're using smells delicious. 


Something I also noticed about this mask is its consistency and texture - I have never actually used a mask like it. Unlike most that are often a lot creamier, this is a lot thicker and chunkier. It isn't going to give you an opaque coverage all over the face like others masks do. This is purely an aesthetic thing however as the mask does cover the whole face but due it's consistency, it isn't as smooth a formula. 


As it is intended for dryer skin types, this chunky texture helps to exfoliate the skin as well as soothe it - the exfoliation however is not harsh at all and is instead very gentle on the skin causing no irritation. I also found it to leave a nice little "film" after washing it off that wasn't greasy but just left the skin instead feeling really soft and moisturised. Due to its formula, it's much easier to remove than masks that dry into the skin and get everywhere so I actually really liked that about it as well. 

Whilst this certainly isn't a mask that is going to clarify blemished or spot prone skin, it is one that is definitely going to moisturise and nourish it. My skin felt lovely after using it each time and I definitely felt like it helped to moisturise it as well as to exfoliate areas of tougher dryness. The delicious scent added to that pampered feeling that the results also helped to deliver as well. 
Overall, I really enjoy this mask and would definitely re-purchase it. I think it will be particularly effective in the Winter months when many people start to get dryer skin - if this sounds like something that'd interest you, I'd definitely check it out in your local Lush store now!


9.28.2015

OOTD | Knits and Rips


What I'm Wearing:

Newlook Jumper | £7.99
Topshop Joni Ripped Knee Jeans | £38.00
Newlook Chelsea Boot | £19.99

9.26.2015

FINDING THE PERFECT LIPSTICK FOR YOUR SKIN TONE.

Skin tone generally forms the basis of most of our makeup troubles when it comes to finding the right shade for us. There's firstly undertones to consider; are we cool, warm or neutral? And what the hell is the difference between them anyway?!

When you feel like a particular lip colour or blush shade just doesn't look right on you, it's probably down to it not quite being the most flattering for your skin tone. Though I certainly believe there are no strict rules in makeup and you should wear whatever you want, I think it's always helpful to have a basis from which to begin with and work from. In this post therefore, I thought I'd look at lip colours and and how to find the shades that are the most flattering for your skin tone. I hope this comes in handy in some way and that of course, you enjoy!

First Things First: Undertone:

We of course have a fair idea of what our skin tone is but in the world of makeup and colour matching, it's not quite as simple as that. More than just knowing your skin colour, the undertones of it are often what dictates what colours are really going to suit you. There are generally 3 kinds of undertones that you may fall under and they are: warm, cool and neutral.

** TIP TO FINDING YOUR UNDERTONE EASILY **

Look at the veins on your wrist:

PHOTO CREDIT: www.kisscosmetics.co.uk 
1. If your veins look blue, you have COOL,  PINK undertones.
2. If you veins look green, you have WARM, YELLOW undertones.
3. If you have a mixture of both coloured veins, you have NEUTRAL undertones.

Finding the Perfect Lip Colour:

So, now you know how to find your undertone, you have the perfect basis for finding a flattering lipstick colour.
Generally, a good rule to stick to is to look for a lipstick colour that matches your skins undertone - so, for yellow undertones you want lipsticks that are on the warmer side and are pink or orange based. For pink undertones, go for cooler shades that are blue or purple based! And for neutral, you can pretty much wear any shade!

RED:

FROM L to R:
COOL: Mac's Ruby Woo
WARM: Mac's Lady Danger

PINK:
FROM L to R:
COOL: Revlon's Pink Pout
WARM: Mac's Modesty 
NUDE:

Choosing a nude lip has more factors than simply finding your undertone. For something to look "nude" on your, your generally want a colour 2-3 shades darker than your own skin tone so that is the most important factor here. As always, if you have cool, neutral or warm undertones, consider this and you find that perfect nude as well!

And there you have it, those are the basic tips I have for finding the most flattering lipsticks shades for you. Hopefully, you found this helpful and interesting in some way - happy lipstick shopping!


9.22.2015

Haul ft MAC and Victoria Secrets!

Hello everyone! How is your week going so far?
Mine is going pretty well, it isn't long now till I start back at University - which strangely, I'm looking forward too! Let's see how long that lasts..

Anyway, I recently got a few things and thought I'd post a mini haul about it. Firstly, I made a repeat purchase of a product I've really been enjoying for the past few months. It is none other than the Garnier Micellar Cleansing Water. This for me is a skincare basic and I'd definitely recommend it - you can check out a review I wrote on this product here!

 Next is a product I have heard so much about for quite a long time now in the beauty community. That product is MAC's Paint Pot in "Soft Ochre" which is a cream formula, eyeshadow base. I wanted something to dull out the pigmentation of my eyelids and provide a clean base for my eyeshadows and so far, I'm really enjoying this!


And finally, I took a trip to Victoria Secrets.. No, I didn't get a fancy (and extremely overpriced) bra or pair of undies but something even better; a body mist! This stuff is in the scent "Mango Temptation" and is DIVINE. Seriously, it smells so good - if you are ever near a VS store, give it a sniff and you'll see what I mean!

And that's it for my little haul, I hope that you enjoyed this post and I shall speak to you on my next!


9.18.2015

My Favourite Nail Care Products

Nail care is something that I have recently taken a more invested interest in. As a kid and teenager, I was a dedicated nail biter and this left me with fairly damaged, weakened nails. As I have gotten older, I have come to value my nails more and want them to be in the best condition they can be.
And so, I began to take a little time to give my nails some much needed TLC and I have definitely seen an improvement. In this post, I'm going to share with you some of my favourite products for nail care and maintenance - enjoy!


This is a strengthening treatment that you do for a week at a time - if using it for its primary purpose. You can also use it as a top and base coat which is what I do as well in between treatments. I have really seen an improvement in the condition of my nails with this product - I have not had ANY breakages since using this treatment, it's awesome! Look out soon for a full review on this product.


This is a bit of a random addition to my favourites and is more for the hands rather than the nails but I wanted to mention it because I've really been enjoying it. 
This is an intensely hydrating hand cream that as the name suggests, was originally made for those who worked with their hands in laborious jobs. However, you can buy it from places like Amazon and I have found it really effective on my hands when they are dry and a little worse for wear. It's not greasy, absorbs fast and leaves your hands soothed and moisturised for hours.


I love this cuticle butter from Lush because firstly, it smells amazing. It's also really moisturising and nourishing on my cuticles which regularly can be quite dry. It absorbs quickly into the skin and it can actually be used on several areas of the body such as your elbows and feet! I reviewed this product in full and you can read that review here


I like this because it's great for on the go - it's got a handy little brush applicator which makes it easy to get the product in and around your nail. It has a really nice scent to it that isn't too overpowering and though it is an oil, I find it does absorb quite well. 


My nails peel quite easily and certain nail files can worsen this because they aren't the best quality. I love this nail file because it will basically last me a lifetime. Because of what it is made off, it smooths the nails and files them perfectly without causing any damage whatever way you file. This is something I would definitely recommend investing in!


9.15.2015

NOTD | All Tied Up

Hey everyone! I hope you're having a good week so far. I'm on quite the roll lately with nail posts - for some reason, I'm just really enjoying doing my nails! Today I went for something a little more neutral and then opted for a glitter accent nail to add a little sparkle to my manicure!


What I'm Wearing:

Essie | All Tied Up

The Best Of: Barry M

As a self-proclaimed beauty fanatic, I like to think I have acquired a pretty good knowledge on certain brands and what they have to offer. With that in mind, I thought it would be interesting to start a new series on my blog that looks at "The Best Of" certain brands. I will shortlist my personal favourite items from each chosen brand and tell you a little bit about why I love them so much.


So, I'm going to kick this new series off with Barry M - though it's a cosmetic brand that offers a variety of products, I'm going to focus on what Barry M is perhaps best known for and that is their nail polishes! I've racked up quite the collection over the years and today I'll share with you what I consider to be the best of the bunch!


The first polish I love from Barry M is their Diamond Glitter (350) polish. I love this particular glitter from Barry M because it's very dainty and full of smaller glitter pieces. This makes for a really beautiful addition to whatever shade you're wearing and adds a little bit of dimension to your manicure!


Next is Cotton (506) which is a bold, white shade. I have found it difficult in the past to find a good white nail polish - one that doesn't require a million different layers and isn't streaky. This one however is opaque in 2 layers and I don't find it be streaky at all - win!

Next up is Heather (402) which is part of their "Silk" range. It has a beautiful pearly finish and the shade itself is very soft and feminine. This dries super fast and is great for a quick manicure.


 Mint Green (304) is another shade that I love from Barry M - it's a perfect summer colour and this also dries fairly fast which is great. I don't usually gravitate towards greens on my nails but I think this one is really pretty.


And finally, we have Bright Red (262) - this is a much loved shade of mine as you can probably tell. This is an all round, classic and bold red shade that I think is a great staple in anyones nail polish collection.


And those are my personal favourites from Barry M's nail range - what are yours?

9.11.2015

NOTD: Cotton


Nails: Barry M Gelly Hi-Shine Nail Paint in "Cotton" | £2.50

9.09.2015

Mini Haul Ft. Lush & Butter London!

Hello everyone! I hope you're having a good week so far. Mine has been pretty good and one particularly good thing that happened in my week was that I GOT A JOB! 
This will be my first "proper" paid job and I'm super excited to start it. 


Anyway, in todays post I just wanted to share with you a small haul from this week. 
The first thing that I got was a Lush bath bomb - it's the Rose Jam bubble bar and the main reason I wanted it was for its really beautiful smell. It's sweet and candy-like and that's my favourite!


Finally, I got two nail polishes from the brand Butter London. Now, I'm not one to spend ridiculous prices for nail polishes even if they are higher end and in this case, it was no different! I got these polishes for only £3.99 each - £8.00 less than their RRP! How you ask? From TK Maxx!
 I had no idea it had such an awesome collection of beauty products - I'm actually really impressed at their collection, especially in nail polishes, you should definitely check it out.


9.07.2015

NOTD: Iridescence.


On my nails currently is a Mavala polish in the shade "Iridescense" from their "That's My Colour Collection".

Mavala is slowly becoming one of my favourite nail polish brands and this colour in particular is one I really love.

What's on your nails today?

8.31.2015

Uni Tips for Newbie Students!

As the first day of University draws closer for many, nerves are sure to be kicking in. You'll ask yourself questions like "How hard is the work going to be?" and "How will I make friends?" and the panic will increase. 

As I myself approach the final year of my University experience, I think I'm now qualified enough to write a post giving you a few snippets of advice that have helped me personally through the years. University should be far from scary and hopefully, this post might help you to see that.

Get Involved:

This one's pretty self explanatory; get in there and get involved! Join societies and schemes that interest you - this is not only a sure fire way to build up your portfolio and gain experience, but it's also a way to meet new friends. What better way to meet a potential new buddy then in an environment where everyone shares the same interests?

Balance is Important:

I'm definitely guilty of letting my inner-hermit control me a little too much. It's cool to enjoy your own company (I definitely do), but getting out there now and then and socialising is a great way to relieve yourself of the inevitable stress that approaching deadlines will bring. 
Hey, you might even like it. 

Note Down Those Deadlines:

Nobody likes to think of their deadlines but it's actually pretty handy is you face them head on. By that I mean know exactly when they are, note them down and be prepared. Knowing when those dreaded due dates are will allow you to know just how much time you have on your hands and that's going to make you feel a lot better about all that work, trust me.

Keep a Reference Book:

I hate references but unfortunately, they're a necessary part of most written assignments in University - especially if your course is theory heavy. Keeping a note of every useful reference you come across (and Harvard referencing them as you find them) is going to save you so much time when you come to writing future assignments - including your dissertation!

Do Things Early(ish)!

I'm a worrier and so early to me is basically as soon as I receive said assignment but don't worry, I don't mean that early. But, do try and get your work done with maybe a day or two to spare. Believe me, there's nothing worse then giving your work in on the day of the deadline - it's super scary and full of equally worried students pulling their hair out trying to get work done on time. The last thing you want is something to go wrong last minute and you don't hand that assignment in on time. 


And, that's pretty much all the wisdom I can think of for you right now. 
Hopefully, these little snippets of advice will help you to feel a little more prepared for Uni and a little more clued up on how to deal with certain aspects of it. If you have any University advice of your own, feel free to share it in the comments!

8.27.2015

How To: Pink Dip Dye

For the past few months, I've been rocking pretty "normal" hair in a bid to restore my locks to their original, natural colour. Doing this meant I had to ditch my beloved purple hair that I had at that time for around 5-6 years straight, sob! I wanted to do this to give my hair a break from dreaded permanent dyes and to give it a chance to grow out naturally and damage free. My love of colour however has been creeping up on me for these past few weeks and I decided a good compromise was to try a little bit of dip dye. So, I scoured the web for the best bleaching kit and got right to it! In this post, I'm going to tell you the products I used as well as my method for achieving my pink dip-dyed hair!


So, after a little bit of research, I found that the Bleach London DIY Dip Dye Kit appeared to be the most consistently popular and best reviewed with customers and so I decided this was what I was going to go with. In terms of the actual dye, I already had a pot of Directions - Flamingo Pink left from my previous dyeing escapades. In the Bleach London kit you get everything you need to bleach your hair including a handy little mixing pot, a tint brush and even a reincarnation mask to give your bleached ends a little love afterwards. 

How I Did It:

So, after following the instructions from my bleach kit carefully (make sure you do the same with whatever kit you use!), I sectioned my hair ready for application. The kit itself recommends splitting your hair into three sections; 2 front sections and 1 back section. My hair is pretty thin and so I found two worked for me.

1. To work with my hair a little more easily and to ensure as precise an application on each side as possible, I split my hair into two pony tails and I pulled the bobble on each one down the hair to the level I wanted the dip dye to begin. After doing this, I applied the bleach starting from the ENDS up as I wanted to a achieve a kind of "fade" effect. I applied the bleach using the brush but altered between my fingers (wear gloves!) too - do whatever works for you to ensure complete saturation!

2. When I came to the start of wear my dip would begin, I used the lint brush to streak the bleach up a little in a random way to achieve more of a blended effect rather than a straight across line of colour. You could also back comb the bit of the hair where the dip dye begins to achieve a similar effect - in hindsight, this is what I would recommend as I didn't really get as much of a fade as I would have liked.


3. Once you're happy with your application, let it formulate! My kit said the maximum time was 45 minutes which would have taken my hair to a light yellow. As I was using a pink, I knew that orange tones weren't really an issue for me so I didn't allow it to process for the full time and instead let it process for around 25-30 minutes. If you're wanting a cooler toned colour like a blue, you're going to want to let it process to the lightest you can within the maximum time frame to eliminate any tones that are going to effect your chosen colour and how it applies to your hair. Pinks, reds and purples however will be fine on hair that's a little orange I've found. 

4. Once your hair has formulated, it's time to wash it. Wash your hair REALLY well - at least 2-3 times to make sure all of that bleach is well and truly washed out of your hair. Go in with a good conditioner or mask to add a little moisture to your hair afterwards. I then let my hair air dry for most of the drying process but did go in with a blow dryer to finish it off. 


5. Finally, it's time to go in with your chosen dye. As I said, I used Directions - Flamingo Pink and applied it in much the same was as I did the bleach - dividing the hair into two pony tails and applying it all over the lightened hair. I again streaked the dye a little bit near where the dip dye began for a bit of a faded effect and made sure that my hair was fully saturated. I then wrapped my ends in cling foil which helps the hair to soak up the dye and waited for around 20 minutes before rinsing it. When rinsing it (if using Directions or a conditioning semi perm dye), I didn't add any shampoo or conditioner as the semi-permanent doesn't require you too. I rinsed with very cold water as this helps to eliminate fading.

And you're done! I'm really happy with my results and the whole process took about 2 hours which isn't bad at all. What are your thoughts on my new hair? Do let me know if you try this out or if you've ever dip dyed your hair before!

Thanks for reading! xo


8.24.2015

Bioglan Supergreens Powder

Today I'm mixing it up a little bit and doing a post that I've never actually done before; I'm going to be reviewing a food/drink item. The item in question is the Supergreens Powder from the brand Bioglan

But first, a little bit of information behind the product...

Bioglan's Supergreens Powder is a mixture containing all sorts of nutritional ingredients that are derived from fruits, vegetables, greens, herbs and live cultures. There are varying flavours in the range but each serving of this powder is at least the equivalent of 10 portions of fruit and vegetables.

That all sounds pretty impressive, right? The whole concept that I could simply drink 10 portions of fruit and vegetables is what really caught my attention and so I decided I just had to give this product a go. In terms of preparation, you have quite a few options regarding how you consume this powder. You can for instance, put it into milkshakes, juices or even yoghurts - though there really aren't any rules in how you want to have it - whatever works for you.


As far as I have seen and researched, there are currently 3 flavours available in this range and I have tried all of them. My favourite by far is probably the Cacao mix which is equivalent to 14 portions of fruit and veg and my least favourite has to be the "Tropical" flavour (which tastes anything but) that is the equivalent to 10. Finally, there's also the Berry Burst flavour which doesn't have much to it in terms of taste but it is still quite pleasant. As I said, the Cacao mix is definitely my favourite because when mixed with milk, it literally just tastes like chocolate Nesquik which is a win for me.

In terms of seeing any effects or changes from using this product, I'd definitely say that it is a little early to really tell if anything big has happened. Like any healthy lifestyle change, you need to give it time for you to see improvements and development and this would need to be a product that you are regularly consuming. However, it is still in my opinion nice to know that I am consuming ingredients and nutrients that are good for me and having read reviews from others that have consistently used this product, it has definitely been said that they feel and even look better! I will be sure to update you guys in the near future on my thoughts and feelings on this product after continuous use - this post is mainly an overall review on my opinions on its concept and to tell you all about it.


At a price of £21.99, I do think this product is quite expensive but when I consider what it claims to be giving you in just one portion, it actually isn't that bad of a deal. One packet will last you for 2 weeks - for me, I have even found I can sometimes get 3 weeks use out of it, too. If we compare how much it would cost to physically eat 10 portions of fruit and vegetable a day, I think we can begin to see that the price difference may not actually be that big. Another thing that makes this product a little more worth it for me is the fact that it is regularly apart of Holland and Barretts "Penny Sale" offer meaning you can get over £40 worth (2 packets) of this product for the price of one - and that is when I like to buy it.

Overall, I think this is an interesting concept and one in which I think is definitely worth giving a go. Of course, already consuming fruits and vegetables in still definitely important but I think that this product is a great way to get some extra nutrition into your system which can't be a bad thing. As stated above, I'll definitely get into a more consistent regime with this product and I shall share with you my results in doing so!

8.18.2015

OOTD | 18.08.15


Newlook Denim Jacket | £19.99
Missguided Jumpsuit | £9.00
Converse | £45.00
Asos Tan Bag | £15.00

8.15.2015

NOTD: Style Cartel

Hello everyone! I hope you're having an awesome weekend so far.
Today I thought I'd do a nails of the day post on my blog. It's been a while since I've done one of these and since doing so, my nails have improved quite a lot in both strength and appearence. For the last month, I've been using a nail treatment on and off (which I will be doing an indepth review on soon) and I have been seeing some really amazing improvements which has made me enjoy painting my nails again!


So, the colour I selected for this particular nail painting session was Essie's "Style Cartel" which is a gorgeous deep blue shade that looks more on the electric side in certain lights. As with many Essie polishes, this provides great coverage and it dries quickly. I topped this shade off with my favourite OPI top coat and there you have it! 


8.12.2015

Urban Decay's Naked Flushed Palette in "Native"

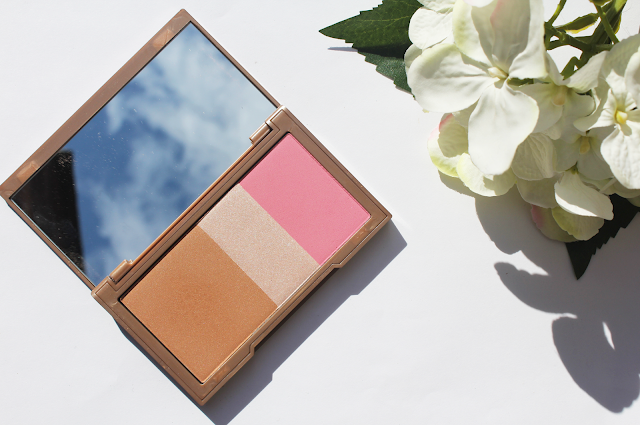
Hi everyone! Today I have a first impressions post on the Urban Decay Naked Flushed palette! Mine is in the shade "Native" and the palette comes with a bronzer, a highlight and a blush! One of the reasons this palette really called out to me is because of the blush - it is a very bright pink shade that really caught my eye. I also really enjoy when multiple products can be found in one handy little palette because usually, you're saving money AND not having to dig around in your makeup collection for separate items.


The bronzer in this palette is described as a "medium bronze shimmer" which I'd say is pretty spot on. I don't think it's as shimmery as you would first think which for me, is a good thing. I think certain skin tones on the warmer side could potentially even use this as a light contour shade, too. It is sheer as described but I do find it to be quite buildable at the same, if you're into very subtle bronzers then you might like this shade but I'm not sure it's going to work to well on darker skin tones.


Next we have the highlight which is described as a "pale pink shimmer" - again, Urban Decay have got this description pretty correct especially with an emphasis on the shimmer. This highlighter goes a long way and is very pigmented. For that reason, it's going to be easy to over apply to bare that in mind! It is however very pretty and it does blend out nicely.

urban decay

Finally, we have the blush described as a "bright pink" - it is definitely very bright and on the paler side so it would probably suit cooler skin tones the best in my opinion. I find it to give quite a nice, natural flush of colour but I do think it's quite buildable and if you want more colour payoff, you can definitely get it. It has quite a powdery consistency and produces quite a bit of fallout in the pan, so be careful when applying!


All 3 products do blend nicely and feel quite soft on the skin - they're not buttery soft though as Urban Decay's eyeshadows are so well known for being and for me, that's a little disappointing. 
This was my first facial product from Urban Decay and while I do like the palette, I'm not as impressed as I would have wanted to be. Nothing in this palette really makes me go "wow" and I think that's a bit of a shame. I do think it provides a nice, natural look to the skin and it's definitely a palette I'll use but I think it's pretty.. forgettable. Though it's advertised to be for all skin colours, I'm not sure darker skin tones are really going to get much out of this line either - a lot of the shades really don't look dark enough.

Overall, I'm not really sure if I'd buy this palette again. If you're interested in it, I'd definitely look at swatches and / or swatch in store first to see if it's really right for you. However, if you know you want something natural and you're not afraid of shimmer, I think this might just be something you'd like.

You can grab this palette at £22.50 at Debenhams!
Beauty Bay

Latest Instagrams

© Levinia Jayne. Design by Fearne.