-->

8.31.2015

Uni Tips for Newbie Students!

As the first day of University draws closer for many, nerves are sure to be kicking in. You'll ask yourself questions like "How hard is the work going to be?" and "How will I make friends?" and the panic will increase. 

As I myself approach the final year of my University experience, I think I'm now qualified enough to write a post giving you a few snippets of advice that have helped me personally through the years. University should be far from scary and hopefully, this post might help you to see that.

Get Involved:

This one's pretty self explanatory; get in there and get involved! Join societies and schemes that interest you - this is not only a sure fire way to build up your portfolio and gain experience, but it's also a way to meet new friends. What better way to meet a potential new buddy then in an environment where everyone shares the same interests?

Balance is Important:

I'm definitely guilty of letting my inner-hermit control me a little too much. It's cool to enjoy your own company (I definitely do), but getting out there now and then and socialising is a great way to relieve yourself of the inevitable stress that approaching deadlines will bring. 
Hey, you might even like it. 

Note Down Those Deadlines:

Nobody likes to think of their deadlines but it's actually pretty handy is you face them head on. By that I mean know exactly when they are, note them down and be prepared. Knowing when those dreaded due dates are will allow you to know just how much time you have on your hands and that's going to make you feel a lot better about all that work, trust me.

Keep a Reference Book:

I hate references but unfortunately, they're a necessary part of most written assignments in University - especially if your course is theory heavy. Keeping a note of every useful reference you come across (and Harvard referencing them as you find them) is going to save you so much time when you come to writing future assignments - including your dissertation!

Do Things Early(ish)!

I'm a worrier and so early to me is basically as soon as I receive said assignment but don't worry, I don't mean that early. But, do try and get your work done with maybe a day or two to spare. Believe me, there's nothing worse then giving your work in on the day of the deadline - it's super scary and full of equally worried students pulling their hair out trying to get work done on time. The last thing you want is something to go wrong last minute and you don't hand that assignment in on time. 


And, that's pretty much all the wisdom I can think of for you right now. 
Hopefully, these little snippets of advice will help you to feel a little more prepared for Uni and a little more clued up on how to deal with certain aspects of it. If you have any University advice of your own, feel free to share it in the comments!

8.27.2015

How To: Pink Dip Dye

For the past few months, I've been rocking pretty "normal" hair in a bid to restore my locks to their original, natural colour. Doing this meant I had to ditch my beloved purple hair that I had at that time for around 5-6 years straight, sob! I wanted to do this to give my hair a break from dreaded permanent dyes and to give it a chance to grow out naturally and damage free. My love of colour however has been creeping up on me for these past few weeks and I decided a good compromise was to try a little bit of dip dye. So, I scoured the web for the best bleaching kit and got right to it! In this post, I'm going to tell you the products I used as well as my method for achieving my pink dip-dyed hair!


So, after a little bit of research, I found that the Bleach London DIY Dip Dye Kit appeared to be the most consistently popular and best reviewed with customers and so I decided this was what I was going to go with. In terms of the actual dye, I already had a pot of Directions - Flamingo Pink left from my previous dyeing escapades. In the Bleach London kit you get everything you need to bleach your hair including a handy little mixing pot, a tint brush and even a reincarnation mask to give your bleached ends a little love afterwards. 

How I Did It:

So, after following the instructions from my bleach kit carefully (make sure you do the same with whatever kit you use!), I sectioned my hair ready for application. The kit itself recommends splitting your hair into three sections; 2 front sections and 1 back section. My hair is pretty thin and so I found two worked for me.

1. To work with my hair a little more easily and to ensure as precise an application on each side as possible, I split my hair into two pony tails and I pulled the bobble on each one down the hair to the level I wanted the dip dye to begin. After doing this, I applied the bleach starting from the ENDS up as I wanted to a achieve a kind of "fade" effect. I applied the bleach using the brush but altered between my fingers (wear gloves!) too - do whatever works for you to ensure complete saturation!

2. When I came to the start of wear my dip would begin, I used the lint brush to streak the bleach up a little in a random way to achieve more of a blended effect rather than a straight across line of colour. You could also back comb the bit of the hair where the dip dye begins to achieve a similar effect - in hindsight, this is what I would recommend as I didn't really get as much of a fade as I would have liked.


3. Once you're happy with your application, let it formulate! My kit said the maximum time was 45 minutes which would have taken my hair to a light yellow. As I was using a pink, I knew that orange tones weren't really an issue for me so I didn't allow it to process for the full time and instead let it process for around 25-30 minutes. If you're wanting a cooler toned colour like a blue, you're going to want to let it process to the lightest you can within the maximum time frame to eliminate any tones that are going to effect your chosen colour and how it applies to your hair. Pinks, reds and purples however will be fine on hair that's a little orange I've found. 

4. Once your hair has formulated, it's time to wash it. Wash your hair REALLY well - at least 2-3 times to make sure all of that bleach is well and truly washed out of your hair. Go in with a good conditioner or mask to add a little moisture to your hair afterwards. I then let my hair air dry for most of the drying process but did go in with a blow dryer to finish it off. 


5. Finally, it's time to go in with your chosen dye. As I said, I used Directions - Flamingo Pink and applied it in much the same was as I did the bleach - dividing the hair into two pony tails and applying it all over the lightened hair. I again streaked the dye a little bit near where the dip dye began for a bit of a faded effect and made sure that my hair was fully saturated. I then wrapped my ends in cling foil which helps the hair to soak up the dye and waited for around 20 minutes before rinsing it. When rinsing it (if using Directions or a conditioning semi perm dye), I didn't add any shampoo or conditioner as the semi-permanent doesn't require you too. I rinsed with very cold water as this helps to eliminate fading.

And you're done! I'm really happy with my results and the whole process took about 2 hours which isn't bad at all. What are your thoughts on my new hair? Do let me know if you try this out or if you've ever dip dyed your hair before!

Thanks for reading! xo


8.24.2015

Bioglan Supergreens Powder

Today I'm mixing it up a little bit and doing a post that I've never actually done before; I'm going to be reviewing a food/drink item. The item in question is the Supergreens Powder from the brand Bioglan

But first, a little bit of information behind the product...

Bioglan's Supergreens Powder is a mixture containing all sorts of nutritional ingredients that are derived from fruits, vegetables, greens, herbs and live cultures. There are varying flavours in the range but each serving of this powder is at least the equivalent of 10 portions of fruit and vegetables.

That all sounds pretty impressive, right? The whole concept that I could simply drink 10 portions of fruit and vegetables is what really caught my attention and so I decided I just had to give this product a go. In terms of preparation, you have quite a few options regarding how you consume this powder. You can for instance, put it into milkshakes, juices or even yoghurts - though there really aren't any rules in how you want to have it - whatever works for you.


As far as I have seen and researched, there are currently 3 flavours available in this range and I have tried all of them. My favourite by far is probably the Cacao mix which is equivalent to 14 portions of fruit and veg and my least favourite has to be the "Tropical" flavour (which tastes anything but) that is the equivalent to 10. Finally, there's also the Berry Burst flavour which doesn't have much to it in terms of taste but it is still quite pleasant. As I said, the Cacao mix is definitely my favourite because when mixed with milk, it literally just tastes like chocolate Nesquik which is a win for me.

In terms of seeing any effects or changes from using this product, I'd definitely say that it is a little early to really tell if anything big has happened. Like any healthy lifestyle change, you need to give it time for you to see improvements and development and this would need to be a product that you are regularly consuming. However, it is still in my opinion nice to know that I am consuming ingredients and nutrients that are good for me and having read reviews from others that have consistently used this product, it has definitely been said that they feel and even look better! I will be sure to update you guys in the near future on my thoughts and feelings on this product after continuous use - this post is mainly an overall review on my opinions on its concept and to tell you all about it.


At a price of £21.99, I do think this product is quite expensive but when I consider what it claims to be giving you in just one portion, it actually isn't that bad of a deal. One packet will last you for 2 weeks - for me, I have even found I can sometimes get 3 weeks use out of it, too. If we compare how much it would cost to physically eat 10 portions of fruit and vegetable a day, I think we can begin to see that the price difference may not actually be that big. Another thing that makes this product a little more worth it for me is the fact that it is regularly apart of Holland and Barretts "Penny Sale" offer meaning you can get over £40 worth (2 packets) of this product for the price of one - and that is when I like to buy it.

Overall, I think this is an interesting concept and one in which I think is definitely worth giving a go. Of course, already consuming fruits and vegetables in still definitely important but I think that this product is a great way to get some extra nutrition into your system which can't be a bad thing. As stated above, I'll definitely get into a more consistent regime with this product and I shall share with you my results in doing so!

8.18.2015

OOTD | 18.08.15


Newlook Denim Jacket | £19.99
Missguided Jumpsuit | £9.00
Converse | £45.00
Asos Tan Bag | £15.00

8.15.2015

NOTD: Style Cartel

Hello everyone! I hope you're having an awesome weekend so far.
Today I thought I'd do a nails of the day post on my blog. It's been a while since I've done one of these and since doing so, my nails have improved quite a lot in both strength and appearence. For the last month, I've been using a nail treatment on and off (which I will be doing an indepth review on soon) and I have been seeing some really amazing improvements which has made me enjoy painting my nails again!


So, the colour I selected for this particular nail painting session was Essie's "Style Cartel" which is a gorgeous deep blue shade that looks more on the electric side in certain lights. As with many Essie polishes, this provides great coverage and it dries quickly. I topped this shade off with my favourite OPI top coat and there you have it! 


8.12.2015

Urban Decay's Naked Flushed Palette in "Native"

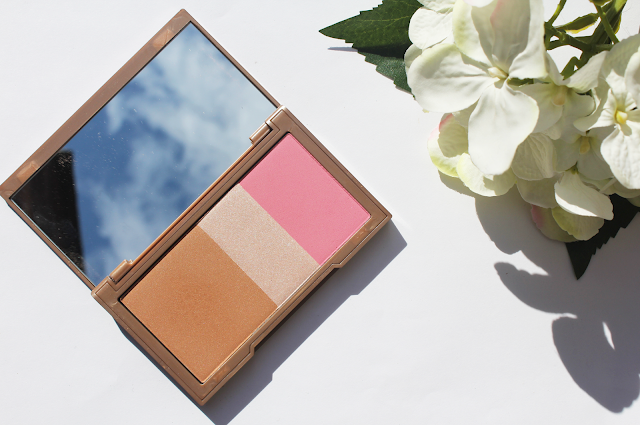
Hi everyone! Today I have a first impressions post on the Urban Decay Naked Flushed palette! Mine is in the shade "Native" and the palette comes with a bronzer, a highlight and a blush! One of the reasons this palette really called out to me is because of the blush - it is a very bright pink shade that really caught my eye. I also really enjoy when multiple products can be found in one handy little palette because usually, you're saving money AND not having to dig around in your makeup collection for separate items.


The bronzer in this palette is described as a "medium bronze shimmer" which I'd say is pretty spot on. I don't think it's as shimmery as you would first think which for me, is a good thing. I think certain skin tones on the warmer side could potentially even use this as a light contour shade, too. It is sheer as described but I do find it to be quite buildable at the same, if you're into very subtle bronzers then you might like this shade but I'm not sure it's going to work to well on darker skin tones.


Next we have the highlight which is described as a "pale pink shimmer" - again, Urban Decay have got this description pretty correct especially with an emphasis on the shimmer. This highlighter goes a long way and is very pigmented. For that reason, it's going to be easy to over apply to bare that in mind! It is however very pretty and it does blend out nicely.

urban decay

Finally, we have the blush described as a "bright pink" - it is definitely very bright and on the paler side so it would probably suit cooler skin tones the best in my opinion. I find it to give quite a nice, natural flush of colour but I do think it's quite buildable and if you want more colour payoff, you can definitely get it. It has quite a powdery consistency and produces quite a bit of fallout in the pan, so be careful when applying!


All 3 products do blend nicely and feel quite soft on the skin - they're not buttery soft though as Urban Decay's eyeshadows are so well known for being and for me, that's a little disappointing. 
This was my first facial product from Urban Decay and while I do like the palette, I'm not as impressed as I would have wanted to be. Nothing in this palette really makes me go "wow" and I think that's a bit of a shame. I do think it provides a nice, natural look to the skin and it's definitely a palette I'll use but I think it's pretty.. forgettable. Though it's advertised to be for all skin colours, I'm not sure darker skin tones are really going to get much out of this line either - a lot of the shades really don't look dark enough.

Overall, I'm not really sure if I'd buy this palette again. If you're interested in it, I'd definitely look at swatches and / or swatch in store first to see if it's really right for you. However, if you know you want something natural and you're not afraid of shimmer, I think this might just be something you'd like.

You can grab this palette at £22.50 at Debenhams!

8.09.2015

OOTD | 09.08.15

Hey everyone! I hope you've all had a good week and a happy Sunday! Today, I have yet another outfit post for you - I'm a roll right now with the fashion posts, huh? 
Anyway, I decided to make the most of the sun we had the other day and I actually wore a skirt for the first in forever!

Newlook Denim Jacket | £19.99 (Currently on sale!)
Newlook Striped Top (Similar) | £7.99 (Currently on sale!)
ASOS Satchel | (Unavailable)


8.07.2015

OOTD | 07/08/15

Hey everyone! I've got another outfit post for you all today. I'm keeping it really casual in today's outfit (my favourite) mixing different coloured denims and wearing my beloved Converse!

Select Polka Dot Cami | Unavailable
Cath Kidston Book Bag (Similar) | £18.00

8.03.2015

My Favourite Teas!

I am an avid tea drinker, it is probably one of the most quintessential British qualities that I possess. Though I am definitely accustomed to a good old cup of traditional English tea, I thought it only right to branch out a little and try some different kinds of tea. With that in mind, I wanted to share with you some of my favourite teas!


I really enjoy this selection of tea because it has a great range of flavours within it. All of the teas are caffeine free and made with natural ingredients which means they're great to relax with and enjoy any time of the day. 
There are five flavours in this selection which are: Strawberry & Raspberry (my personal favourite), Cranberry & Blood Orange, Blackcurrant & Vanilla, Mango & Strawberry and Cranberry & Raspberry.


I am a fan of peppermint tea but usually find it too strong for my liking. Recently however, I found this green tea from the brand Teapigs that has mint infused within it. For me, this is the perfect balance of the mint flavour and I think it works really well with the taste of green tea. The flavour is strong but not overpowering and the particular green tea they use in this brand is not as astringent and so is actually more on the sweeter side!

3. Clipper's Green Tea | £2.99

This particular tea is very refreshing and is in my opinion, just an all round easy to drink tea whatever the time of day. It makes a great replacement for normal tea and it's flavour isn't too overpowering either which I enjoy. I do like to add sugar to this as sweeter teas are more to my taste but it does taste very pleasant without it! If you're new to trying herbal and fruit teas, this is a great one to begin with.


What are some of your favourite teas? I'd love to know!
Beauty Bay

Latest Instagrams

© Levinia Jayne. Design by Fearne.