-->
tutorial

11.14.2016

Bright & Autumnal

It's been a while since I've posted a face of the day. Despite my somewhat extensive bright eyeshadow collection, lately I've been playing it safe with nudes and neutral smokey eyes so yesterday, I decided to mix it up a bit with a bright, Autumnal eye AND a bright lip. Bright eyes and bright lips, you heard correctly.

I really love the outcome of this look - especially the contrast between these bronze, pink and red shades and my blue eyes / pale complexion. I also added a little something to my eyelashes by opting for a few medium sized individual lashes on the outer corner - an addition I've been enjoying adding to my makeup looks lately!


6.07.2015

Tips For Taking Good Blog Photos!

For me, one of the most important parts of any blog - particularly those that regularly feature products of some kind - is good photography. I always enjoy reading other peoples tips on taking good pictures as well as taking inspiration from others' use of visual elements and composition. With that in mind, I thought I'd share with you guys information about what I use to take photos for my blog as well as my tips on taking a good photograph!
Hopefully, some of you might find this helpful or at least an interesting read.

What I Use:

For my photographs, I use a DSLR in the form of the Canon 60d. Though you definitely do not need a DSLR to take a good photograph, if you are thinking of making the investment, then I definitely would! They have multiple uses for both photos and video recording and as well as that, you get so much control over the kind of image you want to take and how creative you want to be. I love my 60d and I'd totally recommend it if you're looking for a good DSLR.

Photo Credit: www.kenrockwell.com
 I also have the Nikon D3200 and for the price, it is another brilliant camera that I'd also recommend. Usually, my DSLR is the only equipment I use with the exception of perhaps sometimes an external flash and a tripod.
Photo Credit: firstelectro.com
I'm definitely not an expert in the world of photography but from University modules and personal practise, I'd say I at least know a thing or two. One of the things that helped me improve my skills and knowledge outside of my studies are online tutorials and guides. Here is a link to a great one for those of you who are new to using a DSLR and want to get to grips with the basics!
Good Lighting:

A good lighting set up makes the photo taking process way, way easier! You don't have to mess around with settings for ages and it makes the editing process less extreme as you won't have to edit levels and such too much. You don't need a specialist lighting set up to get decent lighting for your picture, just go to a location in your house or wherever you take your pictures and find the lightest spot you can - whether that's by a door, or a window. If worst comes to worst (and if it's not raining of course) you can also shoot outside!
If you use a DSLR, a good piece of kit for those times when there's little to no natural light, I like to use my external flash. Mine is a Canon Speedlite 580EX II - it's on the pricier side but there are plenty of less expensive alternatives on the market that work just as well so if you're interested in getting one, definitely just browse around for one most ideal for you.
Composition and Arrangement:

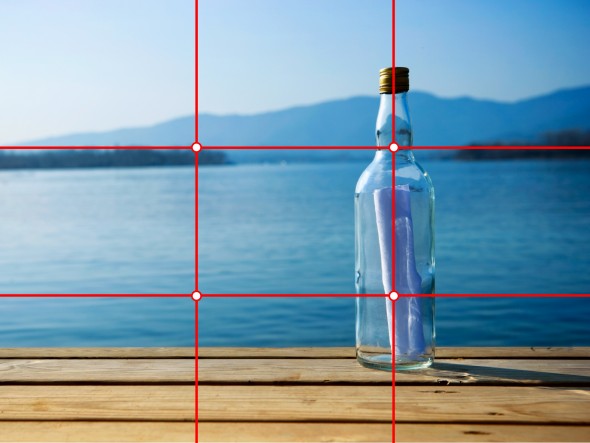
Composition refers to the placement and arrangement of all the visual elements in your photo. An interesting composition really helps to make a photo stand out. You can use the rule of thirds to think about how you'd like to arrange anything you want to include in your photo - things don't alway s need to be in the centre of a shot for instance - you may want to move it more to the right of left for a more interesting shot. 
Photo Credit: www.blendspace.com
As well as placement in the shot itself, you may want to think about the kinds of shots you want for the products or things you're snapping. If you're doing an outfit post for instance, perhaps you can do an assortment of different poses. If you're snapping some makeup products, you can open up the products themselves for a more diverse and detailed photo. 
Play around with composition and have fun with it to discover the kind of style you most enjoy!
Decorative Visuals:

Adding decorate elements is definitely not something you have to do but sometimes, you may want to add a little something here and there to add something more to your photo. I do sometimes however like to just have a plain white background and take more minimalistic photos of products. Then again, sometimes I like to add decorative items such as fake flowers and pretty hair accessories to spice up my image a little.


You can add all sorts to your own image such as something with an interesting pattern like a scarf or headband, you can also even add some of your favourite accessories or jewellery pieces or even your favourite homely elements such as mugs and notebooks to add that extra something.
Editing:

For me, I like to keep my editing minimal - it's easy to make a photo look overdone and my main concern is making whatever I'm photographing look as close to what it looks like in person as possible. Usually therefore, that means editing the levels a little bit, boosting the brightness and sometimes the contrast or saturation. Often this is done just to make colours look more to true to what they are in real life.
I use Photoshop - this is of course a big investment and not everyone is going to want to splash the cash on editing software. That's not an issue though as there are tonnes of great editing programs on the market that will suit you find for basic photo editing. TechRadar have put together a list of the top 10 free photo editing programs and you can check out that list here.
And that's it! Those are my tips and thoughts on taking a good photograph. These tips have definitely helped me along the way - looking back to my first blog posts and up to now, I see such a development in the way I take my pictures! I hope you found this post helpful and as always, thank you for reading!

 post signature

1.08.2015

OCC Lip Tar: A How To!

OCC Lip Tar's are a cult beauty product and more and more people are discovering their love for them. I'm definitely one of those people and over the last year or so, I've been obsessing over the wonder product that is lip tar! In this post, I thought I'd share with you my thoughts on OCC's infamous product as well as how to best apply it for the most comfortable and best looking wear.

Firstly, you may be wondering what exactly Lip Tar is: 
  • Created by Obsessive Compulsive Cosmetics (OCC), their lip tar is basically a liquid lipstick. 
  • It is packaged in a sort of lip gloss-esque tube and it's highly and I mean highly pigmented. 
  • You also only need the smallest amount for an opaque application - seriously, you need a tiny bit.
  • In a full size Lip Tar, you get 10ml of product and let me tell, you will never run out of it - it's that pigmented and that concentrated. 

OCC makes their Lip Tar formulas in two finishes: Matte and Metallic. They have a whole host of colours available in both of these finishes from primary colours such as yellow and blue to bright neon pinks and dark blackened purples. There's truly a colour for everyone in my opinion - and if there's not, well you can actually make your own simply by mixing them together.

Now, let's get into the good stuff:

With every lip tar, you receive a mini lip pencil and believe me, you get this for a reason. You don't want to be applying this product straight from the nozzle without a brush because it's just not going to go well!

Being so darn liquid-y and rich in pigment, a brush is the best way to evenly distribute the product and ensure you get a precise application. It's also the best way to avoid mess and any potential bleeding or transfer of the lip tar onto your face or anywhere else (it can leave a temporary stain).

Being so highly concentrated, lip tar can tend to bleed if worn alone without any other products. To combat this I'd of course suggest the use of a brush, but I'd also suggest a lip liner too. I'm not really a major fan of lip liner personally so I don't really want to buy every colour under the sun and I don't always wear it if I can get away with it. So, a clear liner is perfect for me and is definitely something I'd recommend to you. OCC in fact, make a great clear liner called 'Anti-Feathered' that helps to do just that - stop your lip tar bleeding! OCC also make a clear lip primer in similar packaging to their Lip Tar which I find it conjunction with their liner is very effective.


** If you do make a mistake with the Lip Tar (which believe me, I always do) it's easy to tidy it up with a small, thin brush and some concealer. Trace the outline of your lip for a nice, clean edge and be sure to blend it out well! **

So, I think that pretty much covers the basics of Lip Tar and what to do with it... One last thing though: LESS is MORE! Use a bit at a time and you'll find applying Lip Tar way less of a daunting task - don't forget it takes the tiniest bit to make that colour super opaque and vibrant so don't feel like you have to pile it on!

And that my friends, is everything I wanted to cover in this post. Hopefully, you are now a little bit more knowledgable in the world of Lip Tar or perhaps I've simply managed to grab your interest to go ahead and try it out. Which by the way, you totally should! Lip Tar is awesome stuff.

OCC is primarily sold in the US so it's not as readily available for us in the UK. However there are stores that stock it with my personal favourite being Cocktail Cosmetics who sell products from a whole range of awesome indie makeup brands. Love Makeup also sell lip tar, as do Selfridges! OCC Lip Tar's range from around £11-£13 which considering how much you get and how little you need, is an absolute bargain in my eyes!

Thank you so much for reading this post, what are you thoughts on OCC's Lip Tars?

7.07.2014

Summer Fruits Smoothie Recipe

Hello! Today on my blog I thought I'd write about something a little bit different. I've been really enjoying eating more fruit recently and I've been making my own smoothies as well. In this post, I want to share a really simple recipe for a delicious fruit smoothie that I've been enjoying in particular. There are two variations of this smoothie will only one extra added ingredient which will make it more filling and therefore appropriate for breakfast in the morning. Let's get started!

You'll need:


  • 450g Summer Fruits (Strawberries, cranberries, cherries, blueberries etc!)
  • 500g of Strawberry / Raspberry or Vanilla Yoghurt (Personally, I love using raspberry)
  • 100ml of Milk
  • 2 Spoons (or to taste) of Honey
  • 25g of Porridge Oats (Optional, this will make the smoothie more filling)


To make, simply whiz all of these ingredients into a blender or smoothie maker and pour! That's really all there is to it and you will have yourself a healthy, delicious smoothie. I've only ever kept mine for around a day or two and I know that the smoothie stays absolutely fine within that period. I would suggest making it with the intention of drinking it sooner rather than later though as it does tend to thicken! This recipe will make you around 2-3 servings so feel free to change it depending on how much you desire.


I'd really recommend you give this smoothie a go and there tons of variations you can play around with if you fancy something a little different. Either way though, it's a really nice healthy drink and one that literally takes a few minutes to make. 

Let me know if you try this recipe and what you think of it! Also, if you have any similar recipes you'd like to share, I'd love to hear them!

Thank you for reading. 

 photo ScreenShot2014-04-06at152327.png

6.21.2014

Makeup of the Day: 20/06/14.


Hey guys, I've got a makeup look for you all today. I thought I'd share this  look I came up with today: it's a shimmery pinky / purple smokey eye and with a nude coral lip. I didn't really know where I was going to go with this look when I was doing it but I quite like how it turned out.


The whole eye look was more or less done with the Sleek i-Divine palette in 'Vintage Romance'. I used the shades Marry in Monte Carloe on the whole lid itself and Honeymoon in Hollywood in the crease. I then used A Vow in Venice and Bliss in Barcelona mixed with Forever in Florence to further deepen the crease and outer eye. Then, right on the middle of the lid I added a little bit of Court in Cannes to add a bit more of dimension to the look. I highlighted with my Sugarpill single eyeshadow in Tako and finished the eye look off with a soft winged liner, a nude liner in my waterline and some of my favourite mascara. 

That's the look complete - i'll be sure to leave links and prices to all the products used to create this look below. Thank you for reading and let me know what you think of this look! 

Maybelline The Rocket Mascara | £7.99 (Currently on a 3 for 2)
Maybelline Baby Skin Primer | £7.99 (Currently on a 3 for 2)
 photo ScreenShot2014-04-06at152327.png

Beauty Bay

Latest Instagrams

© Levinia Jayne. Design by Fearne.